Tuesday, December 28, 2010

Slacker...

I've been slacking off lately in the brewing department... I haven't really gotten anything done in awhile. Just bottled the gluten free beer. Tested it about a week after starting primary fermentation, and it tasted great! Strangely, after 3 weeks in the primary I tasted it, and I didn't like it whatsover! Either chestnut/honey beer does not taste good aged, or I ended up with some problems somewhere else. The taste I got was more phenolic then anything else...which is weird because most phenols are produced during the yeast metabolism stage (something I should have been able to taste after a week).


Leah and I will be hosting a St. Pattys Day party here at the house, so I'll have to get an Irish red ready for March!

Wednesday, September 22, 2010

Gluten Free Brewing

I'm always looking for new and interesting brews to make. So when my aunt Carol came to me with an idea with a gluten free beer, I loved the challenge!

Gluten free brewing is part of a small movement of brewers to provide a "beer" that would not contain barley, wheat, or other sources of gluten. Folks with Celiacs Diseasse suffer from a disorder in which gluten attacks the inner lining of their intestines. Therefore many go on a strict gluten free diet.

Needless to say, the lack of barley and wheat is completely outside the realm of a convential brewer. We'll need to think outside the box. Many of the already produced gluten free beers, are made with Sorghum. Sorghum is a grain grass which does not contain sources of gluten. Doing a bit of research into sorghum brewing yields many people complaining of the aftertaste of sorghum beers. It seems sorghum can leave a sour twang in most brews that is usually unpleasant. So I tried to look in a different direction.

After a few hours of searching, I came across a webpage, where an individual sells roasted chestnut fruit chips for brewing. I also then found a forum post in HomebrewTalk about this very subject. I decided to try a mix of both sorghum and chestnut fruit chips. For the sorghum, I'll be using Briess White Sorghum Syrup.

Chestnut Mash

The chestnut mash is going to be different then anything I've ever done before. This will be a 24 hour mash schedule. Since chestnuts do not contain enzymes to convert starch to sugar (found in barley and wheat), we will need to add an artificial enzyme to the mash. I'll be using the amalayse enzyme. I'll likely start the strike water at around 180° to 190° F, to end with a mash temp around 158°. Amalayse is destroyed by higher temperatures, so once the boil begins, the amalayse will denature. The 24 hour mash schedule should hopefully release all the sugars that I can get from the chestnuts.I"ll end up sparging with enough water to get up to near my normal boil volume of 6.5 gallons.

Note that the chestnut chips will not lend that much sugar to the wort (likely up to 1.014). It will actually add more color and flavor then anything else. Therefore we'll need to up the sugar content. I will use the sorghum syrup simillar to liquid malt extract, as well as add 2.5 lbs of honey. I will use corn sugar to up the sugar content if any of my potential gravity calculations come out wrong. With the large amount of simple sugar, there will be little body. Maltodextrine will be used to add a bit more body to the beer.

Here's the official recipe:


Mash:
5.00 lb Fruit - Chestnut Chips (3.0 SRM - Mash 1 day) Grain
Amylase Enzyme (Mash 1 day) Misc

Boil:
60 min 3.00 lb White Sorghum Syrup 45H (3.0 SRM) Extract
60 min 0.00 lb Corn Sugar (Dextrose) (0.0 SRM) Sugar (depends on preboil grav)
60 min 2.50 lb Honey (1.0 SRM) Sugar
60 min 0.75 oz Centennial (60 min) Hops
10 min 0.25 oz Centennial (10 min) Hops
5 min 0.25 oz Pectic Enzyme (Boil 5.0 min) Misc (to help with pectin haze)
5 min 0.50 oz Orange Peel, Bitter (Boil 5.0 min) Misc
5 min 0.50 lb Maltodextrine (0.0 SRM) Sugar
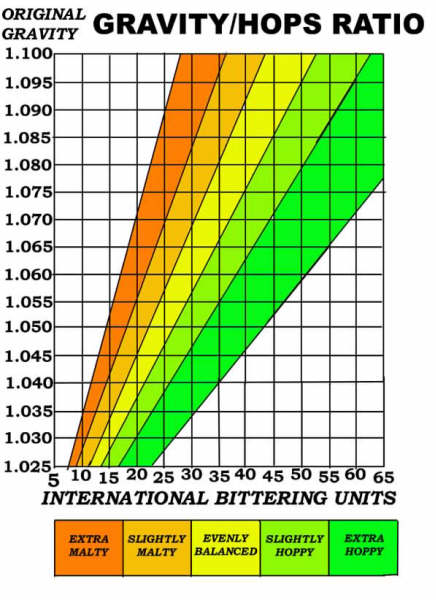
Est Original Gravity: 1.051 SG
Est Final Gravity: 1.013
Estimated Alcohol by Vol: 4.92 %
Bitterness: 29.0 IBU
Calories: 43 cal/pint
Est Color: 4.6

Thursday, June 24, 2010

Strawbeery Beach Blonde Ale Brew Day

Here's a few pics from the Strawbeery Beach Blonde's brew day!


Hoppin' it up! I use a thin mesh paint straining bag to control the hops in my boil. It really cuts down on the trub going into the fermenter. There is a trade off though, with a minor decrease in hop utilization.


Mother Earth Brewing's cellerman Pete (Do you have my business card?) Frey. He stopped over to offer some great brew day advice. We had 4 people in the beer business over that brew day. It was great to get some insight on the distribution business from our neighbor Kenny, as well as Pete's friends from New Bern.


After the brew feremented out in the primary, I added 5lbs of strawberries into the secondary fermenter.


This brew is on tap right now. While there is only a slight hint of strawberries, this is a great light summertime brew!

Kegerator Build - Part Four (Final)

A few of you have been bugging me to finally put up the final pictures of the kegerator. Since I finally have her cooling, serving, and fermenting beer, here's what she looks like:

I needed to find a way to secure the CO2 tank in the back of the fridge...this is what I came up with. Not the most ingenuitive ideas, but hey it gets the job done. The bungee cord pulled the legs on the table towards eachother. In order to mitigate that I attached a piece of thin angled aluminum stock to the two table legs.


Here's another view of the CO2 setup with the tank secured. This should be nice and easy when I have to switch CO2 tanks.


I wanted the temp controller's probe to be close to where I inserted it into the fridge. I took a piece of aluminum left over from the turkey fryer parts I bought when I went to all grain. This allowed me to put a small shelf on the inside of the fridge. I have the temp probe sitting in a beaker of water. This will prevent the fridge from switching on and off more frequently.


Here's a look with the kegs in the bottom of the fridge. That's One Love Wit on the right, and Strawbeery Beach Blonde on the left. Notice the long lines. The friction inside long beer lines help to slow the flow of the beer to the tap. This allows the beer to come out in a nice slow pour instead of 15psi and all foam. For more information on balancing your keg lines, see Kegerators.com


Here's a look at a keg of Schulz Kolsch priming with CO2 on the top shelf. I'll eventually hook this up to tap #3.


The Convenience Center rocks!


Here's the final product on the front. I made the left two tap handles from some wooden figurines I found. The far right one is a Leine's seasonal. I think the wet erase markers look awesome!


Well that's my project! After a few months of off and on work, tons of gluing and polyurythane, and plenty of beer, it's all ready to serve up. It is very nice having beer on tap at your house...however this also leads you to drink ALOT more.

Thursday, June 10, 2010

Strawbeery Beach Blonde Ale

I've been a slacker in posting lately! The kegerator is finished, I just haven't been getting any pictures of it... (I'm too busy using it). I did a strawberry beer last month. And I have a Kolsch right now lagering in the fridge.


Here's the strawberry recipe:

Amount  Item                  Color    %Grain Bill
8.00 lb Pale Malt (2 Row) US 3.0 SRM 51.61 %
2.00 lb White Wheat Malt 2.4 SRM 12.90 %
0.50 lb Oats, Golden Naked 10 SRM 3.23 %
Amount  Item                 Time
0.50 oz Pallisades [6.70 %] 60 min Hops 11.8 IBU
0.50 oz Pallisades [6.70 %] 15 min Hops 5.9 IBU
5.00 lb Fruit - Strawberry 2 weeks secondary
1 Pkgs German Ale/Kolsch (#WLP029) Yeast-Ale
75 min single infusion mash 150°.  Double batch sparge.

Est Original Gravity: 1.057 SG
Est Final Gravity: 1.014 SG
Estimated Alcohol by Vol: 5.63 %
Bitterness: 17.7 IBU
Calories: 233 cal/pint
Est Color: 5.5 SRM

Sunday, April 25, 2010

Kegerator Build - Part Three

I know I know.... I've been super slow on this. I keep having to wait for parts or different parts, or other different parts to get this thing together. Currently. One problem I ran into is apparently no single place in the country had stainles steel shanks in stock! I ended up having to order mine over ebay. However one of them had a bad coupling nut, so I had to send it back. I'm currently waiting on that before I can complete everything. The kegerator is starting to actually look like something other then a demolished fridge though.


I've also found a super cheap place to have my aluminum CO2 tank refilled. R & D's Fire Control in Newport fills tanks for $1.50 a pound. This would cost me $7.50 to fill my tank! From what I've read most places would charge you $10-$15.


All exposed insulation has now been covered by the vinyl flooring I got.


The fridge will need to be kept at a certain temperature for the kegs. Therefore I'll need something to control the fridge's temperature. I purchased this external refrigerator thermostat. I drilled a hole straight through the fridge. When doing this, you need to make sure there aren't any coolant lines that run through the wall.


In order to seal up the hole, I used well nuts. I had to cut a slit with the dremmel for the wire to go through.


I've fit the well nut onto the wire. I then glued this nut to both sides of the fridge to help keep any cold air from escaping.


I then took some caulk and, for an extra seal, surrounded the wire nut. Behold my awesome caulking job....


Here's the mounted temperature controller. I have it held up with a 3lb hook magnet.


Here's the holes I cut out for the shanks. The shanks are 7/8" wide, so I used a 7/8" drill bit and some sandpaper so that the shanks fit very snuggly into the holes.


Here's a closeup of the cut hole. There is about 2 inches of foam insulation in the door I had to get through, along with layers of plastic and metal.


Here are the holes from the inside of the fridge. I'll eventually use an extra piece of the composite wood I used for the table to provide a backing to bolt the shanks to.


I decided I wanted a nice black and wood look to the fridge. I decided to use these precut pieces of wood to provide a nice buffer between the faucet and the fridge.


I used a "Golden Pecan" wood stain as well as 3 coats of polyurathane on the wood to get the desired look.


With more then 1 or 2 kegs in the fridge, you'll need a manifold to distribute the gas. I didn't really know where I wanted to mount mine. I came up with using a old shelf from the fridge. The shelves hooked on to the back wall. I 2/3 of the shelf arm off on one side, and then drilled 2 holes in it. I then used a U-bolt to secure the manifold to the shelf.


Here's a closeup of the manifold. Notice the U-bolt that goes right around the middle of the manifold to hold it up.


Here's a view of the manifold with all the hoses. One of the hoses will go underneath the table to connect the manifold to the gas tank.


I purchased a black wet-erase board online. I'll be able to use liquid chalk markers on this board. They look a lot better then regular dry erase markers.


Here's a look at the stained, poly'd, and mounted wood pieces for the front. I also have 2 of the shanks mounted in them.


That's about it for now. Still waiting on a few pieces before I can complete this baby, but I can't wait till she's set up!

Friday, March 26, 2010

Hop Charts


I've been saving these two nice images I found on the internet to share with you guys. The first one is a generic IBU vs Original Gravity. This is a great quick reference when looking to formulate your own recipes. Depending on how you like your beer, plan accordingly with this handy tool.


The second image is something I want framed in my brew cave! This fancy ass piece of artwork is a hop reference to end all hop references. I has nearly every single hop available right now. It also provides flavors/aromas associated with each hop, and how much of those particular flavors/aromas are contributed. This is probably thee single best hop reference chart available. (Click on the image for the full scale)