The fourth and final beer in the 750ml series was Southampton's Scotch Ale. I saved this one for last because I'm a big fan of "British Isle Style" ales. Scotch Ale is named because...ta da!...it was first made in Scotland! The Scotch Ale is a lightly hopped and sweetly malted brew. They traditionally will have roasted malt flavors as well. Beersmith tells me something quite interesting: "Any caramelization comes from kettle caramelization and not caramel malt (and is sometimes confused with diacetyl)." Note to self...when you make a Scotch Ale....boil for the caramalization (don't use caramel malts).
Thursday, November 26, 2009
Monday, November 23, 2009
Southampton 750 Series - Cuvée des Fleurs
Well the name should give it away. Like the last 2 the Cuvée des Fleurs is another one of Southampton's French farmhouse ales. This is the first beer I've ever had that is an "Ale brewed with Flowers and Rose Water". Fancy eh? Cuvée translates to "wine" in French, and Fleurs translates to "Flower". So I'm guessing the name of the brew would translate to "Wine of Flowers". Reading from the back of the bottle: "Cuvée des Fleurs is a unique brew of our own imagination. We flavor this distinguished ale with a variety of flowers including L. angustifolia, A. nobilis, C. officinalis, and a generous amount of H. lupulus". By the way... H. lupulus is the common name for hops :-)
Appearance
The beer pours a nice golden yellow. The 2 fingers of head very quickly dissipated. The head on this beer was very thin...more like that of a carbonated soda. I almost wonder if that was an effect of the flowers that this brew is produced with. Needless to say...no lacing. Even with the yeasties a bit stirred up from the bottom of the bottle, this was still a fairly clear beer.Smell
Holy Flower Power! You immediately get a very diverse aroma that smells like a summer garden. The floral aromas are exceptionally strong, however they don't overpower too much. There is a slight yeast scent in there as well.Taste
Another blast of flowers, this time on the tongue. It's hard to determine how much of the flowers used by the beer contribute to the flavor, or if it's mainly a large dose of floral tasting hops. The flavor is so complex though that I have to think that there has to be some contribution from the flowers. It eventually works its way into a dry well bittered finish, albeit still a strong aftertaste of flowerbox.Etc...
While this was a good beer to try, I have a feeling I could only enjoy one on very rare occasions. I struggled to finish both glasses, mainly becaue the floral component was so overwhelming, I just couldn't drink anymore. I would recommend for the avid beer drinker to try this very brew at least once though, as this is a very unique style of beer that one will not be able to find in many places.Thursday, November 19, 2009
Southampton 750 Series - Biere De Garde
The second brew to try for the 750 series is Southampton's Biere De Garde. So other then a very fancy way to spell Beer...what makes this beer unique?
The Bier De Garde or "keeping beer" is a farmhouse style beer that was first brewed in France. The farmhouse style was originally brewed by and for farmers and their hands, brewed for taste with readily available ingredients and served as a reward for a hard day's work. Biere De Garde's literal translation is "keeping beer" as in "keep it for awhile as it gets damn good later on!" The Biere De Garde is Category 16D in the BJCP
Appearance
This beer pours a nice light amber to copper color. The cork came out with a nice solid pop, as this beer was quite well carbonated. A bit of a over anxious pour left me initially with about 4 fingers of head! Have to be careful of the pour as it seems all of the 750ml series are carbed in the bottle, and have a good size yeast cake on the bottom.Smell
A very fruity aroma is present right away on first sniff. There is some nice sweet malt scent as well.Taste
A medium body gives way to a semi-dry finish. Definite hop spicyness on the tongue. Overall a very clean taste that leaves the mouth with a nice clean malty flavor. Doing a bit of research online shows that SHPH uses the French Strisslespalt Hops for this brew.Etc...
Very drinkable beer!! I could easily have polished off another 750ml bottle if I had one! This brew looks to hit the style dead on, and does a great job doing it. I'd give it about a 4/4.5 out of 5.Saturday, November 14, 2009
Southampton 750 Series - Saison Deluxe
Well, I'm up in Long Island for the month. While it sucks being away from home, there's always a great oppurtunity to try some new brews. After hiking the Mashomack Preserve on Shelter Island, I made my way to the Southampton Publick House. After eating some great dinner, and trying 7 of their on tap brews, I brought home all 4 bottles of their "750 series". These brews were not available on tap, and only available in corked and caged 750ml bottles. Over the rest of my trip I will try all 4 of these brews, and give my thoughts on each one
Saison Deluxe
Mmmmm...the high temp fermented Saison. Full of those nice fruity and spicy esters. Saison is the french word for "season". So when you say "Saison" make sure you say it with an outrageous French accent! Especially when you've had a few...it makes drinking it that much more fun! BJCP 16C is reserved for the Saisons. These brews came before the refrigeration. As these brews sat in the 85 to 90 degree heat, the yeast would produce strong esters and phenols that would drive these beers to be very unique.
Appearance
This beer pours a nice dark golden yellow. The cork forced itself out nice and strong. I had a feeling that this beer would be very carbonated and it was. The large amount of yeast in the bottom of the glass shows the brewer bottle carbed. A careful pour still yielded 3 fingers of long lingering head on the glass. The beer was a medium turbiditySmell
An immediate yeasty aroma fills the nose. There is a light hint of phenols there as well.Taste
MMMMMmmmmm... This was a great flavored brew. Yeast dominates a complex flavor that includes a nice sweetness with light phenols. A moderate mouthfeel gives way to a bitter and long lasting finish with spicy pepper powering the taste.Etc...
This is an extremely flavorful and complex ale. The 7.4% ABV is masked extremely well. The finish makes me find myself wanting more, and I could easily find myself pouring glass after glass of this if it wasn't for the hefty price tag. $14 will yield 2 glasses. While this may be a bit depressing for the wallet, you'll make your mouth very happy!Thursday, November 5, 2009
Strawbery Wine
On top of cider, we made some Strawberry wine before I left for NY. The strawberries at the local grocery store were buy 1 get 2 free....kind of hard to pass up the oppurtunity.
Here's our basic recipe:
30 lbs strawberries
3/4 tsp tannin
5 lb corn sugar
4 lb cane sugar (unfortunately we ran out of corn sugar)
2 gallons of water
1 pkg K1-V1116 Lalvin dry yeast
OG of Total: 1.078
We started off by adding all the ingredients to the 6.5 gallon carboy. In order to make sure your fruit (now must) is sanitized, you need to add sulfur in the form of Campden tablets. The goal is to get 50ppm of sulfur into the must. This will kill any bacteria. Since we were using 6 gallons, I needed to get 300ppm for 1 gallon in order to equal 50ppm for 6 gallons. Since my Campden tablets give 30ppm per gallon, I used tablets...this gave me my 300ppm for 1 gallon or my 50ppm for 6 gallons. After waiting 24 hours for the sulfur to dissipate, we're ready to pitch the yeast.
Using a carboy for an initial fruit wine fermentation was my first mistake. If you're going to make wine, make sure to do it in a bucket, not something with a narrow neck.
Here is why:
The fermentation was "vigorous" to say the least!! Upon filling the carboy up to about 6 gallons, I capped it with an airlock and bung. However, one thing I didn't think about was that the strawberries would float. Once the liquid underneath the strawberries started to produce CO2, the strawberries on top were pushed up the neck of the carboy. The airlock quickly plugged with strawberry gunk, and eventually exploded out of the neck, and into the air!! The carboy then spewed molten strawberry lava for the next few hours!!
However it wasn't all bad. The strawberry lava, actually tasted great! They tasted like strawberries dunked in wine, and covered with pop rocks (the CO2 they released made them fizzy).
Needless to say, we had quite the mess to clean up. However when all was said and done, the wine kept on bubbling away without spewing anymore. It's now aging in the cupboard waiting for its first rackings.
Hard Cider
For the month of November I'm going to be working at the New York NWS office. Unfortunately that means I can't brew ....sad.... However, that I can still do some cider!
Leah's parents came down to visit before I left, and they brought 9 gallons of unpasteurized cider with them from a cider presser in MI. The sweet cider tasted great. Hopefully that translates over to a good hard cider, however in the most recent issue of BYO, I read that sweet cider doesn't usually make good hard cider. We shall see.
Here's the recipe I came up with:
4 1/2 gallons unpastuerized cider
1 lb buckwheat honey
1 pt maple syrup
1 lb clover honey
2 cups brown sugar
1 pkg EC-1118 Lalvin Dry Yeast
OG of Cider: 1.050
OG of Cider w/ all fermentables: 1.090
First, we added 1 gallon of the cider into a pot on the stove, and warmed it up to 160 degrees. We then added the honey, syrup, and sugars. After the sugars have dissolved, we cooled down the mixture, and added it along with the other 3 1/2 gallons of cider to the carboy.
I've read that by not pastuerizing unpastuerized cider, the results can be unpredictable, however the best yeast to use for cider is generally the natural cider yeast already found in the cider. I'm hoping that by adding in a packet of wine yeast, the wine yeast will work witht the wild yeast to produce a nice enough product. However this is a big if. For our first cider though, I think it will be an interesting experiment.
Another problem may be that our cider may turn to vinegar. Bacteria turns cider to vinegar, Yeast turns cider to hard cider. However bacteria cannot survive in a CO2 environment. Hopefully the bacteria is poisoned by the yeast producing tons of CO2.
Wednesday, September 2, 2009
Blueberry Ale
I put together a quick recipe on a blueberry beer, and we brewed it a few weeks ago. I just wanted to post a quick few pics on the carboy. The blueberries add a very prominent pink color to the beer. I added the blueberries into the secondary during the primary to secondary racking. I've just racked this to a tertiary fermentation carboy in order to help it clear some more. I'll be crash cooling this over the next week, and then bottling.
7.00 lb Pale Malt (2 Row) US (2.0 SRM) Grain
3.00 lb Wheat Malt, Bel (2.0 SRM) Grain
2.00 lb Caramel/Crystal Malt - 20L (20.0 SRM) Grain
60 min 1.50 oz Cascade [5.50 %] (60 min) Hops
10 min 0.28 tsp Irish Moss (Boil 10.0 min) Misc
10 min 1.10 tsp Yeast Nutrient (Boil 10.0 min) Misc
7 min 1.50 oz Cascade [5.50 %] (7 min) Hops
Add 6 pints (4.5 lbs) blueberries to secondary at racking.
I'm worried there won't be much if any of the blueberry flavor showing through the beer. I think 4.5 lbs may have been a bit too little to compete with the crystal malts...but we shall see. Either way, I think it should turn out good. This will likely get bottled Mid-September.
Wednesday, July 15, 2009
Lagerhead Turtle Mishap
So I haven't posted in a while, however there's a reason for that... We haven't made any beer!! I feel like quite a slacker. The last beer we did make was the Lagerhead Turtle. However the fermentation didn't exactly go as planned.
I first would like to point out a lesson learned... "NEVER USE EXPIRED YEAST". Well I shouldn't say never, but if you do, make sure you create a large starter. I however should have taken my own advice. The yeast was only out of date a few weeks. I figured it would still be okay, however it wasn't.
After 4 days of no fermentation, I declared the yeast dead. Even a gravity reading indicated that no sugar to alchohol conversion had been accomplished. Luckily, I had some dried Nottingham yeast sitting around from a previous kit. I dumped it in without rehydrating... Yeah I know...probably not a good idea. However fermentation kicked in within 24 hours. Since there were so many fermentation problems, I decided not to go with the honey.
So now I should probably call this beer Alehead Turtle... From the rackings I tasted on the secondary transfer, it tasted quite good. We shall see. Sometimes it's better to be lucky then good.
Prost!!
Jeremy
Tuesday, June 23, 2009
Yeast Washing
I prefer to use liquid yeast in all my brews. While dry yeast will give you enough viable yeast in a dry packet, it doesn't have the consistency from batch to batch that liquid yeast does. However there is a price difference between liquid yeast (~$7) and dry yeast (~$1). In order to start saving a bit of cash, I've decided to start washing my yeast.
Yeast washing is a process by which the yeast is seperated from the trub. The trub is a mixture of hop remnants, dead yeast cells, and other unwanted particulate. By seperating out the trub from the yeast, we are able to reuse our yeast for future batches.
Step 1
The process for washing yeast is quite simple. The first step is to sanitize a few large (I use half gallon) mason jars, as well as 2 or 3 pint jars. I used our boil pot as well as some reverse osmosis water. I boiled the jars and lids for approximately 20minutes. After the boil, I promptly covered the jars with the lids, and set them aside for a day to cool. The nice part about this step is it can be done anytime before the racking in the next step.
Step 2
After racking the beer out of the secondary, I pour the water from all the mason jars into the carboy. The carboy is then shaken in order to agitate the sediment off the bottom. I then lay the carboy on its side. In 20 to 30 minutes trub will have fallen to the bottom of the carboy's side. It is at this point that the carboy is slowly poured into the larger mason jar. The goal of the pouring is to leave most (if not all) of the trub behind in the carboy. Note that the basic premise to this is that trub is heavier then yeast, therefore the trub will fall to the bottom, while the yeast is still suspended. After filling the larger mason jar, I put the jar into the fridge to accelerate the yeast dropping to the bottom. I try to keep the jar refrigerated for at least 48 hours, but for this batch I kept it in there for about a week.
Step 3
After most of the yeast has settled to the bottom of the gallon jar, you should be able to see 3 different layers. The top liquid layer is the mixture of beer and water. The second layer is the yeast, and the bottom layer is the little bit of trub that made it in from the carboy. You can see to the left the before and after pictures of the gallon jars. When the water/beer mixture starts to become translucent, it is time to transfer over to the space saving pint mason jars.
Step 4
In order to save space in the fridge, I have to consolidate yeast. This step involves decanting off the water/beer mixture from the gallon mason jars, and then transferring them to the smaller mason jars. This is essentially the same as step two just done on a smaller scale.
The yeast will eventually settle to the bottom of the pint jars in the same way it settled to the gallon jar. This yeast then can be stored for a period of months to be used in another brew. However, reused yeast should likely not be pitched as it is. It is best to create a nice sized starter to make sure you have enough viable yeast. The Mr Malty website has a nice calculator for determining how large of a starter you'll need based on your beer.
Sunday, June 7, 2009
Lagerhead Turtle Recipe
So I put together the Lagerhead Turtle recipe a few days ago, and brewed it last night. Here's the basic recipe:
5.00 lb Pale Malt (2 Row) US (2.0 SRM) Grain 46.51 %
4.00 lb White Wheat Malt (2.4 SRM) Grain 37.21 %
1.00 lb Wheat, Torrified (1.7 SRM) Grain 9.30 %
0.25 lb Aromatic Malt (26.0 SRM) Grain 2.33 %
60 min 1.00 oz Cascade [5.50 %]
7 min 1.00 oz Tettnang [4.50 %]
0 min 0.50 cup Lemon Balm
Add pastuerized honey at high krausen
Primary fermentation (14 days at 50.0 F)
Diacetyl rest (3 days at 60.0 F)
Secondary fermentation (14 days at 52.0 F)
Lager (60 days at 35.0 F)
Full Recipe
My father-in-law, David Roche, helped out with brewing this beer. (It was a great bonding experience! :-) ) We ended up a few points short of the pre-boil gravity. I have a feeling, I didn't get my sparge hot enough, and may have been a bit too warm on my mash temps.
There are conflicting ideas on how to pitch the yeast for a lager. Some say that cooling the wort to fermentation temp then pitch work best, while others prefer to pitch near ale temps, then cool down slowly to fermentation temp. For simplicity sake, I chose the latter. However, doing this will produce enhanced diacetyl (buttery tones) to the beer, so we'll be doing a diacetyl rest at the end of the primary fermentation to allow the yeast to clean up the diacetyl produced.
This will also be my first beer with honey, and herbs. We added the lemon balm at flameout, and will add local honey to the primary during high krausen. I'm not quite sure how this will turn out yet, but I'm excited to try. I don't want to get too strong of a lemon flavor in there, but if I can't discern any after primary fermentation, I may dry hop some more lemon balm in the secondary.
Prost!
Jeremy
Friday, June 5, 2009
New Local Brewery!
I was paging through the April/May edition of Southern Brew News tonight at our favorite pizza shop, when I saw a brief article that caught my eye. Every issue, they have a "What's Pouring In" section that describes brewery happenings across the SE states. In the NC section, it stated that a new brewery was under construction in Eastern NC. The name of the company is Mother Earth Brewing. They're eventually going to institue eco-friendly practices into their brewing. They have a slogan of "Peace, Love, and Beer" which is quite simillar to what Tim and I envisioned as a slogan of our eventual joint brewery dreams!
Mother Earth Brewing will be located in downtown Kinston, NC. The downtown area of Kinston has experienced some hard times, and as such, most of the downtown area seems very depressed. This brewery will be a first step of many to hopefully revitalize the historic downtown area.
It looks as though the first beer they've brewed was their Kolsch...which ironically was the first Leah and I brewed! :-)
I can't wait to see what this new brewery has to offer. They are posting updates on their progress on the Mother Earth Brewing website. I definitely wish their operation well, and can't wait to visit!
Prost!
Jeremy
Tuesday, June 2, 2009
Lagerhead Turtle
So since the weather down here is starting to get really hot, I've gotten the urge to make a good lawnmower beer (A light refreshing beer for hot sunny days). Yesterday at work, I came up with the idea for "Lagerhead Turtle". (Thank you Scott for sparking the idea!)
Loggerhead sea turtles are on the endangered species list, and are found all over the NC coast when it comes time to lay eggs. When Duder and I went out fishing on the Capt Stacy head boat, we were able to see 2 giant Loggerheads eating off the side of the boat! It was quite a site to see!
So for the next week, I'll be working on coming up with this recipe. This will be my first lager! I'm excited to try another new aspect of the brewing process. I will post when I have the recipe completed
In other brew news, Leah and I are going to be leaving next weekend to go to Katie and Nereus' wedding near the Twin Cities. While there, we'll be spending the first few days at my sister's house near Chippewa Falls, WI. And of course NO trip to Chippewa Falls can be complete without the trip to the Leinenkugel's Brewery!! This will be our third time taking the tour, however, I'm sure now with the brewing knowledge I've gained, I'll be able to learn so much more!!
While in the cities, we'll be staying at the luxurious Radisson Plaza Hotel in downtown Minneapolis! It's an extremely nice hotel, and thanks to Hotwire, it only cost us $59 a night!! The best part about the hotel....within walking distance to the local Rock Bottom brewpub! There was many a happy hour spent at the Rock Bottom in Bethesda when I worked in DC. While this won't be the same, I still can't wait to have a Big Horn Nut Brown or perhaps some of their banana El Hefe!
Monday, May 25, 2009
Man's Best Friend Update
So I've been a bit busy here the last few weeks. Jess and Ike came down to visit last week. Ike ended up bringing a cold from "Up North" and infecting all us southerners! While they visited, the Man's Best Friend fermented in the fridge!
Hefeweizen yeasts are known for their banana/clove/bubble gum flavors when they're fermented at the higher end of their temperature range. For Man's Best Friend, I did not want to get any esters into the flavor. Leah and I racked it to the secondary tonight, so in about a month, I'll be able to taste it. Based on the initial tasting during the racking, this beer may turn out to be very tasty!
Original Gravity: 1.052
Final Gravity: 1.013
Alchohol By Volume: 5.08%
Calories: 231 cal/pint
Color: 4.8 SRM
Bitterness: 14 IBUs
Friday, May 8, 2009
Beer Review - St Feuillien Tripel
As I stated in my earlier Tasting Beer thread, "One thing you have to perfect if you are to become a complete brewer, is how to taste beer. While it doesn't sound that hard, it actually is quite difficult when you don't always know what you're trying to taste for.". Refer to this post if you're wondering how I taste my beers.
So in order to perfect this craft, I have to see how others have perfected theirs! This is my first official beer review so take it easy on me! The views below are mine and mine only... Your mileage may vary.
St. Feuillien's Tripel pours a nice golden orange color. The small amount of suspended yeast provides a light turbidity to the brew. The short (say 2 finger width) head that I did have with the beer quickly dissipated. Note: I have heard that hard water will kill head retention in glassware, while I haven't noticed head retention problems in other beers that we've tried with our glasses, this may be a result of the mineral content of our water.
The beer has a nice yeasty aroma with a bit of sweetness and citrus. There's a hint of something else too... Refering to my handy dandy beer color wheel - I think this may be the phenolic odor (adhesive strip smell), that is in there with the citrus.
Ahhh taste! The best part of the brew! The initial taste I got was more of the enhanced phenolic flavor. It definitely comes out more over the smell....at least I think it's phenolic...keep in mind... I'm new at this!! :-) There is also a nice spicy bite to the flavor. I perused a couple of other reviews on this beer, and they mentioned white pepper. It's not quite something I can taste yet though. I'm going to have to go out, and buy some now just to verify! Pepper or not, it is spicy! The finish was the worst part of this beer. Really....everything was on the A- to B+ scale up to this point...however the finish left something to be desired...and it wasn't another sip! This was the hardest part of the beer to determine the flavor. I'm going to say it was a very resiny hop bitterness. However the bitterness left the palate very unappealing. While at 8.5% ABV, the aftertaste slowly diminishes with the glass, even after the bottle was empty it still left a harshness.
Well that was my first experience into the wonderful world of official beer tasting!! If you have any comments, criticisms, complaints, or questions please let me know. I always appreciate feedback. One thing I do know for sure... I need to get myself a nice duvel tasting glass! I've also attached the beer tasting wheel for your viewing pleasure! I just turned on the Brew Crew playing the Cubs on WGN...GOTTA GO!!
Tuesday, May 5, 2009
Man's Best Friend
I've finally put the finishing touches on what I've called "Man's Best Friend". It's a german style Hefe with a blend of Wheat, Pale, and Aromatic Malts.
1.00 lb Rice Hulls (0.0 SRM) Adjunct 7.84 %
6.00 lb White Wheat Malt (2.4 SRM) Grain 47.06 %
4.50 lb Pale Malt (6 Row) US (2.0 SRM) Grain 35.29 %
1.00 lb Wheat, Flaked (1.6 SRM) Grain 7.84 %
0.25 lb Aromatic Malt (20.0 SRM) Grain 1.96 %
60 min 1.00 oz Hallertauer [3.90 %] (60 min) Hops
7 min 1.00 oz Select Spalt [2.00 %] (7 min) Hops
5 min 2.00 oz Malto-Dextrine (Boil 5.0 min)
It will definitely be exciting to try my first all grain wheat beer. The first of many to come!! I chose to go with close to a 60/40 blend of white wheat malt and pale malt. This ratio, along with the flaked wheat should bring out a strong wheat flavor in the brew. The flaked wheat should also provide the chill haze to the beer that is desirable in Hefes. The aromatic malt will lend a distinct, almost exaggerated malt aroma and flavor to the beer, while the malto-dextrine is there to add a bit of body. Hallertauer hops are used a lot in wheat beers. It has a soft, pleasant, and slightly flowery, spicy flavor and aroma. The Select Spalt will be used just for a bit of aroma.
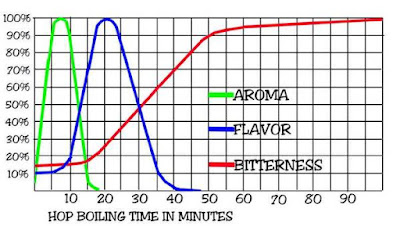
I also wanted to share a great graphic I found online in regards to hop utilization. As you can see, this graphic depicts how your hops will contribute to the beer depending on different boiling times.
Monday, May 4, 2009
Spent Grains
Switching to the all grain brewing process presents a new waste stream in our household. A waste stream of sugarless barley, wheat, oats, and other grains. So far we have come up with 2 great ways to help us reuse this waste stream into something else.
The first and easiest way to reuse our spent grains is to compost them! Leah and I have been composting our kitchen scraps for well over a year now. We had purchased 2 60 gallon pickle barrels from Mt. Olive pickle company for $5 each! That's about 10% the cost of buying them brand new! They still had a bit of pickle smell in them, but a good rinsing, and a week out in the sun made them smell good as new.
Before last week, our compost was aerated about once a week by turning the barrel on its side, and rolling it about the yard. This however failed to mix the compost up properly, and also failed to introduce oxygen to the lower half of the barrel. Oxygen is necessary for composting bacteria (kinda like aerating the wort).
A couple weeks back I designed a tumble style composter that rotated about an axis in the middle of the barrel. You can see the design I created in Delcam Powershape (free for personal use) to the right.
The materials included 38 ft of 2x4s, 12 1/2" bolts, and a 1 1/4" conduit pipe.
Scott and I built the whole thing in less than 5 hours.
The finished product looks and works great! The barrel tumbles with little effort, and mixes anything we add to the it in just a few turns!
The brewing grains we have added to the composter so far have broken down in a matter of days. The bacteria in the compost bin LOVE all the residual sugars in the grains. We've also been adding our trub (sediment and yeast left behind after fermentation) to the composter as well. The yeast and sediment are extremely beneficial to the compost process, and help to break everything down even faster!
In addition to composting, Leah has taken up baking dog cookies with the spent grains! The grains make a perfect low calorie & high fiber treat for the dogs since most of the carbohydrates from the grains have been removed. When she has perfected her recipe, I'll get her to post it.
Other ideas for recycling grains such as granola, bread, cookies, or tofu burgers can be found from the Seven Bridges Cooperative website. This was the company we purchased our all organic ingrediants from!
Thursday, April 23, 2009
All Grain Brewing
Last night Leah and I brewed our first all grain beer! One thing is for certain. All grain brewing is a lot more fun then just brewing extract!! You definitely get a sense of actually creating your beer with all grain rather then just the "beer in a can" method of extract. While both have their pros and cons, I'm happy that we switched.
The Mash
The first step to begin the mash is the heating of the strike & tun preheat water. Instead of trying to preheat the mash tun, add the strike water, and then try to adjust to proper temp, I heated the strike water about 15° warmer then what it should be. The extra heat will then go to preheat the mash tun. Once the strike water has cooled to it's proper temperature (169°), we began the mash in (left). Beersmith, which by far is the most handy tool a brewer could have, calculates my strike temperature for me, by taking into account how much the grain will cool the water to the proper mash temp (154°).
The grain absorbs and cools a large amount of the water in the tun, as we mixed it in. My mash temperature for this recipe is 154°, and the grain cooled my water down to only 156°, so I ended up having to add a bit of cooler water, and then stir it up again to cool it by those last 2 degrees. The mash time for this beer is 60min. The round cooler worked perfectly, and only dropped 1° for the entire mash!
The Sparge
After the 60 minute mash is complete, it is time to rinse the grains. The reason you need to rinse the grains is because there are large amounts of residual sugars that are stuck to the grains. If you don't rinse these off, you end up losing them.
The sparge technique we chose is known as "No Mashout, Double Batch Sparge".
From John Palmer's How to Brew, which is the most extensive online resource for home brewers, "Mashout is the term for raising the temperature of the mash to 170°F prior to lautering. This step stops all of the enzyme action (preserving your fermentable sugar profile) and makes the grainbed and wort more fluid." Instead of doing a mashout, we are using hotter then normal sparge water (180°). This will raise our mash temperature and stop our enzyme action, while at the same time saving us a step.
A Batch Sparge is a sparge technique where by the brewer will drain all the mash water out of the mash/lauter tun and into the boil kettle. The tun is then filled again with the sparge water, mixed throughly for 5 minutes, then is again drained completely into the kettle. Each time the tun is drained, less and less sugars are being removed, and the runnings are clearer. We will be doing a double batch sparge, which means our tun will batch sparged twice.
Before each draining of the tun, a brewer will want to do what is called a "Vorlauf". A vorlauf is a fancy German word for recirculating the first few quarts of runnings back into the top of the tun. The grainbed will act as a natural filter when draining the sparge water, however, the first few quarts that exit the tun after mixing will be filled with large amounts of sediment. By collecting this sediment filled wort, and returning it back to the top of the tun, we can use the grainbed to filter this out.
The brewer will need to vorlauf each time the grain bed is disturbed. In our case, we had to do it after collecting the mash water, and then once with each sparge.
The Boil
Boiling an all grain beer is exactly the same as an extract brew, except for the fact you're boiling a lot more! The burner had a tough time keeping the kettle at a rolling boil with how hard the wind was blowing. We had a preboil volume of 6.5 gallons, and expected a gallon and a half to boil off. However, we only got down to 5.5 gallons. This may leave our beer a little bit weaker then we were expecting. Beersmith had our ABV estimated around 4.8%, however we likely may only reach close to 4.0%. The beer should come out of the primary in a week, so we shall see then.
Wednesday, April 15, 2009
Tasting Beer
Here's what I've gathered so far:
Tasting beer can be broken up into 3 different senses:
Appearance
Smell
Taste
Appearance
What color is the beer? How clear is it? How does it retain it's head?
Color:
Colors of beer range from near clear (Bud Light) to black (Guiness). The color of a beer is determined by the grains that create it. BOTH grain color and beer color are commonly determined on a scale known as Lovibond or abreviated as °L. The Lovibond ranges from a scale of 1 to 600. When one is talking about grains, a Lovibond rating of a few hundred and above is considered quite dark, while when one is talking about beer, anything over 25 is considered to be black. Various beer colors and grain colors.
Clarity:
How much suspended sediment is present in the brew. This is usually known as "Turbidity"
Head Retention:
Carbonation in a beer can add a significant amount of body. I still know a lot of people who drink their beers from a bottle. Unfortunately this is not the way the brewmaster wanted his product to be enjoyed. A good beer is meant to be poured. Pouring helps release a moderate amount of carbonation, which will give beer a more robust aroma, and it helps to release part of the bitterness of the carbonation. A good beer should have a thick white head that leaves a good head lace or "Brussels" on the side of the glass as you drink it.
Smell
What are the scents you recieve after you pour the beer? What is contributed by the grains or other additives? What is contributed by the hops? Can you smell an odor?
Aroma:
Aroma describes the smells of a freshly poured beer that have been contribued by the malts, grains, or anything else besides hops. These aromas are usually described as being malty, nutty, fruity, sweet, grainy, yeasty, etc. I think a trick for the new taster such as myself is being able to pick these out. This is quite challenging at first, because you're tempted to say "It just smells like beer!" Creating my own beer has opened my eyes to the different components of these aromas, and has allowed me to start to smell for them specifically.
Bouquet:
The bouquet of a beer is the contribution from the hops. The bouquet is present initially after the pour, and then rapidly dissipates. Bouquet smells include: piney, citrusy, herbal, spicey, etc.
Odor:
Odor is usually attributed to a defect in the beer. These defects can be such thing as: bleachy, skunky, sulphury, etc.
Taste
What are the flavors present in the beer? Does the beer feel light of heavy in the mouth? What kind of finish does it leave the palate?
Mouthfeel:
The mouthfeel of a beer is the subjective description of how a beer feels in the mouth. This feel is deteremined by the unferementables sugars and proteins in the beer. The 3 categories usually describing mouthfeel is light, medium, or full. I kind of think of it as how thick a beer feels in my mouth.
Flavor:
Flavor for me is still the hardest part of a beer to diagnose. Mainly because I haven't done it that much. When you first take a sip of a beer, make sure you move the drink over all parts of your tongue. This helps to make sure you use all different sections of your taste buds (sweet, salty, etc). Do you taste nutty, fruity, bananaesque, green apples, butter, earthy, etc? Are their strong hop tones? What about malty or yeastiness? Try to distinguish particular flavors that seem familiar.
Finish:
The last part of the beer tasting will be the finish. After the swallow/spit, how does your palate feel? Does the beer leave your mouth with a crisp fresh feeling? What about a bitter hop taste? Does the flavor last for a long time on your palate or quickly dissipate?
In the mail yesterday I recieved a free Killians Irish Red tasting Kit. Inside it has 4 tasting glasses, a nice bottle opener, tasting mat, and a short book on beer tasting. I intend to use this as much as possible! Harrika's Brew House in Cedar Point has a huge amount of craft and smaller brews. I intend to try as many that are there as possible!
If you're still a beginner taster like myself, I suggest finding brew reviews of the beer you have online. Doing this allows you to taste the beer, and compare what you taste to what others are tasting. This has helped me pick out particular flavors that I didn't understand and didn't know how to discern.
Friday, April 10, 2009
Earth Day Organic Ale Recipe
9.00 lb Pale Malt (2 Row) US (2.0 SRM) Grain
0.50 lb Chocolate Malt (350.0 SRM) Grain
0.75 oz Pallisades [5.00 %] (60 min) Hops 13.9 IBU
1.25 oz Pallisades [5.00 %] (5 min) Hops 4.6 IBU
California Ale (White Labs #WLP001) [Starter] Yeast-Ale
April 22nd is the official brew day! Stay tuned for details!
Tuesday, April 7, 2009
Gorgeous April
All Grain
The New Tuns!
Mash Tun Steel Braid
I will also be purchasing a turkey fryer as my new boil kettle. Ace Hardware online has a great deal on a 30qt Bayou Classic Turkey Fryer . This unfortunately will not be used for turkeys...
Since we will be doing 5 gallon full boils now, we will also need a better method for getting our wort to pitching temp. Here comes the wort chiller!
I still have to look into how I want to sparge though. I can't decide on Fly or Batch sparging, and have to weigh the pros and cons soon.
Everything will be ready by April 22nd!
Prost!
Jeremy
Bottle Tags
Revvy's Hanging Bottle Tags
Prost!
Jeremy
Red Ale Bottled
I always get the last of the rackings...
Prost!
Jeremy
Thursday, March 26, 2009
Random Idea at Work
Wednesday, March 25, 2009
Next on Deck
Amidst my futile dreams of awesome brew equipment, I thought of a new brew to do! I would like to do a Organic Brown Earth Day Ale for April 22, 2009. The recipe hasn't been started yet, but I'm working on it. Ideally I would have started this brew last month so it would be ready for Earth Day, however I didn't think of it until now! So instead we will brew the batch on Earth Day instead. Next year, we'll tweak the recipe to our liking and brew it for Earth Day! When we start coming up with labels, I would like to include some form of helpful tip that the drinker could use to help save the environment on each bottle. This is similar to the bottoms of Mickeys caps. I think this is a good idea, but obviously time will tell. However this definitely reminded me of a quote from Tim.... Peace and Beer Brewing- "Brewing Good Vibes since 2008". (I love this name for a brewery) (Right now it's Tim and my hypothetical business brainchild) :-)
I think I tend to think of names before actually coming up with a recipe to go with them.... I compare this to Duder sometimes coming up with the music before the lyrics. I'm definitely not comparing my feeble attempt at brewing to the amazing skills Duder has, just comparing similar styles. I've thought of a brew name I like. Gunnel Jumper Ale. Gunnel Jumping is the process by which someone who is stranded in a canoe without any paddles can get to shore. He/She stands on the sides of the canoe (gunnels) and jumps up and down without going airborne. This pushes the canoe forward. I've done this before in Boy Scouts, and it's actually quite fun to try! Just make sure you're in deep enough water... This brew name reminds me of the time I spent growing up in the Northwoods in WI.
Prost!
Jeremy
Apfelwein
Apfelwein for May Delivery!
Prost!
Jeremy
Bottling Time!
Capped and Ready to Go!
Brewing is definitely fun....but I found the biggest drawback.... THERE AREN'T ENOUGH BOTTLES! Even with the empties from the local bar, we're definitely not going to have enough to produce all the alcohol we would like. At least once we get a good stockpile, we shouldn't have to worry about it anymore. But, I'm definitely excited to try to keg this stuff. That will take a lot of work out the process.
Prost!
Jeremy
Thursday, March 19, 2009
Partial Mash
The speicalized area I want is Wheat. Since I had my first Steven's Point White, I've always been attracted to the unique flavor and characteristics of wheat beers. From the Belgian Wit to the German Hefe, I've grown to love most wheat beers that I've tried. My favorites being Hoegaarden and Franziskaner Hefe-Weisse.
Leah and I finished this Franzi boot off in the Dells!
However, one problem arises with this. The basic extract brewing we've done now, will not work as well with some of the grains needed to produce these beers. I'm going to have to make a Partial Mash Tun. Since Leah and I cannot afford (let alone fit in our house) an all grain system. I think this is a great way to get into more of the grain aspects of brewing without the money and space of all grain.The blueberry wine was bubbling like crazy last night! Since this is our first primary fermentation in a glass container, it was neat to see the CO2 being produced and escaping.
I also wanted to post a picture of our guest bedroom/secondary fermentation chamber! The Kolsch is on the right and the Irish Red on the left. (The pic looks darker then it really is.)
Wednesday, March 18, 2009
Organic Blueberry Wine
We just received a package from Midwest Supplies. It included 2 new 1 gallon jugs. We wanted to try some wine, however we didn't want to go the 5 gallon route. So we thought that these could allow us to experiment a little bit more. It look as though our "brew couple" Tim and Kalli, have also purchased some experimentation vessels as well.
We started off with 4 bottles of Full Circle organic blueberry juice. The starting gravity on just the juice was 1.068. We figured that most of that sugar is likely simple sugar, it should ferment nearly all of it, leaving us with a FG close to 1.000. This would leave us with a ABV between 8 and 9%. The achohol tolerance of this yeast was I believe around 14%, so the juice should ferment out completely dry. We rehydrated our Lalvin D47 yeast, and threw it in the vessel with the juice. We figured we would not have to boil the juice because it came sealed in its containers. Low and behold less then 12 hours later. Our airlocks are bubbling away! We hope to eventually arrest the yeast after we've reached our FG, and then sweeten it up. (We both are not a fan of dry wine).
We also racked our Red Ale to its secondary fermenter. The final gravity ended up being 1.012. Unfortunately this is just a point or two higher then our expected FG. Beer Smith gave us our ABV of 4.7%, however the beer tasted quite watered down. Apparently others have seen this with the Brewers Best Red Ale Kit. However, I know we steeped the grains long enough. We shall see. I've read that a lot of times uncarbonated beer can taste quite thin. It has 2 weeks at least in the secondary and then 3 in bottles, so hopefully the flavor will shine through with age.
I've been reading more and more about the Kolsch style ales. Come to find out the proper way to age this beer is pretty much to lager it after the fermentation is complete. This will give you the true flavor of this beer. For our Kolsch though, we've had it in the secondary for over two weeks at room temperature. Since we're already so excited about this beer, we're not going to lager it. Instead, I've ordered the grains and malts, and we are going to try to replicate the beer, however this time, I'll lager it in the new fridge. This way in a few months, we can compare the beers to find out how the flavor changes from the lager. We'll
When we racked the Kolsch out of the primary I did notice a appley sort of flavor at last taste (It tastes like Budweiser). This is usually a sign of acetaldehyde. This will hopefully be converted out to ethanol, and this flavor will mellow out. We shall see though. The Kolsch gets bottled next week.
Also next week, we're going to start a batch of Edwort's Apfelwein. This recipe has produced over 12,000 gallons on the Home Brew Talk Forums, so I have to try it. Everyone raves about it.
Prost!
Jeremy
Monday, March 16, 2009
First Post!
Leah and I got our home brewing kit for the wedding from our good friends Matt and Laura Smith, and Katie and Nereus (soon to be) Dooley. After Leah moved down here, it sat in our guest bedroom for the winter... Feburary rolled around, and I pulled it from the spare bedroom to our living room. We decided that sometime that month, we were going to finally start using it.
We started doing our research, since neither of us had any experience with this before. I found a great site that had in depth videos of the process: HomeBrewers.com
Right about the same time, one of my best friends from college, Timmy "Stubby" Axford, contacted me, and discussed the brewing Kalli (his wife) and he has been doing. They started their own blog: Northland Brewery. Tim's enthusiasm, as well as ours fueled us to get brewing right away!
We found out we have a local home brewing supply store, Home Brew Haus, in New Bern, NC. I went there one afternoon, and picked up a Kolsch Brewers Best kit. I've read that the standard dried yeast that comes with kits like this can be unreliable from batch to batch. In order to make sure I could get consistent results, I purchased a vial of German Ale/Kolsch (White Labs #WLP029) yeast.
Our first brewing experience I think went about as good as it could have on Feburary 28th. The starting gravity for the wort was 1.046, which was in the range recommended by the instructions. We didn't have any commercial sanitizing sollution, so we used a bleach/vinegar solution, to achieve an adequate sanitation. The yeast took over 24 hours to get started which scared me a little bit that I had done something wrong, but later that evening, the airlock started going like crazy.
We kept the Kolsch in the primary for a week, after the final gravity read 1.010 for a few days in a row. We then racked it to our secondary fermenter to clarify the beer a bit (but mostly to make room for our next brew!). The sample I stole from the primary smelled and tasted great! I can see how the patience part of this, can drive a person crazy!! I was thirsty for more!
Our second brew we started a week after the first. It was a Brewers Best Red Ale. We did have a few problems in our grain steeping this time. We lost control of the temperature (over 170 F), and likely extracted some tannins from the grain. This could lead to a harsh bittering of the beer, however from what I've read, for extract brewing, this could have a minimum effect. The rest of the process went great, and we used a English Ale yeast. The Red Ale goes into the secondary tomorrow. I've already smelled it, and it smelled great, so I'm excited to taste it when we rack it.
I need a cool sign off phrase,
Jeremy